图像伸缩与图像量化算法
图像伸缩
Write a function that takes a gray image and a target size as input, and generates the scaled image as output. Please use bi-linear for interpolation. The function prototype is “scale(input img, size) → output img”, where “input img” and “output img” are two-dimensional matrices storing images, and “size” is a tuple of (width, height) defining the spatial resolution of output. You can modify the prototype if necessary.
算法中使用了双线性插值的方法。首先考虑一个 1 x 1 的方格(见下图),已知四个顶点的值 c00,c01,c10 和 c11,现在需要估算出该区间内某一点 c 的值。第一步是做横向的线性插值:估算 a 点的值为 c01 * (1 - tx) + c11 * tx,并估算 b 点的值为 c00 * (1 - tx) + c10 * tx。第二步是在垂直方向再做一次线性插值,估算 c 点的值为 a * ty + b * (1 - ty),代入 a 和 b 的估算值可得 (1 - tx) * (1 - ty) * c00 + (1 - tx) * ty * c01 + tx * (1 - ty) * c10 + tx * ty * c11。
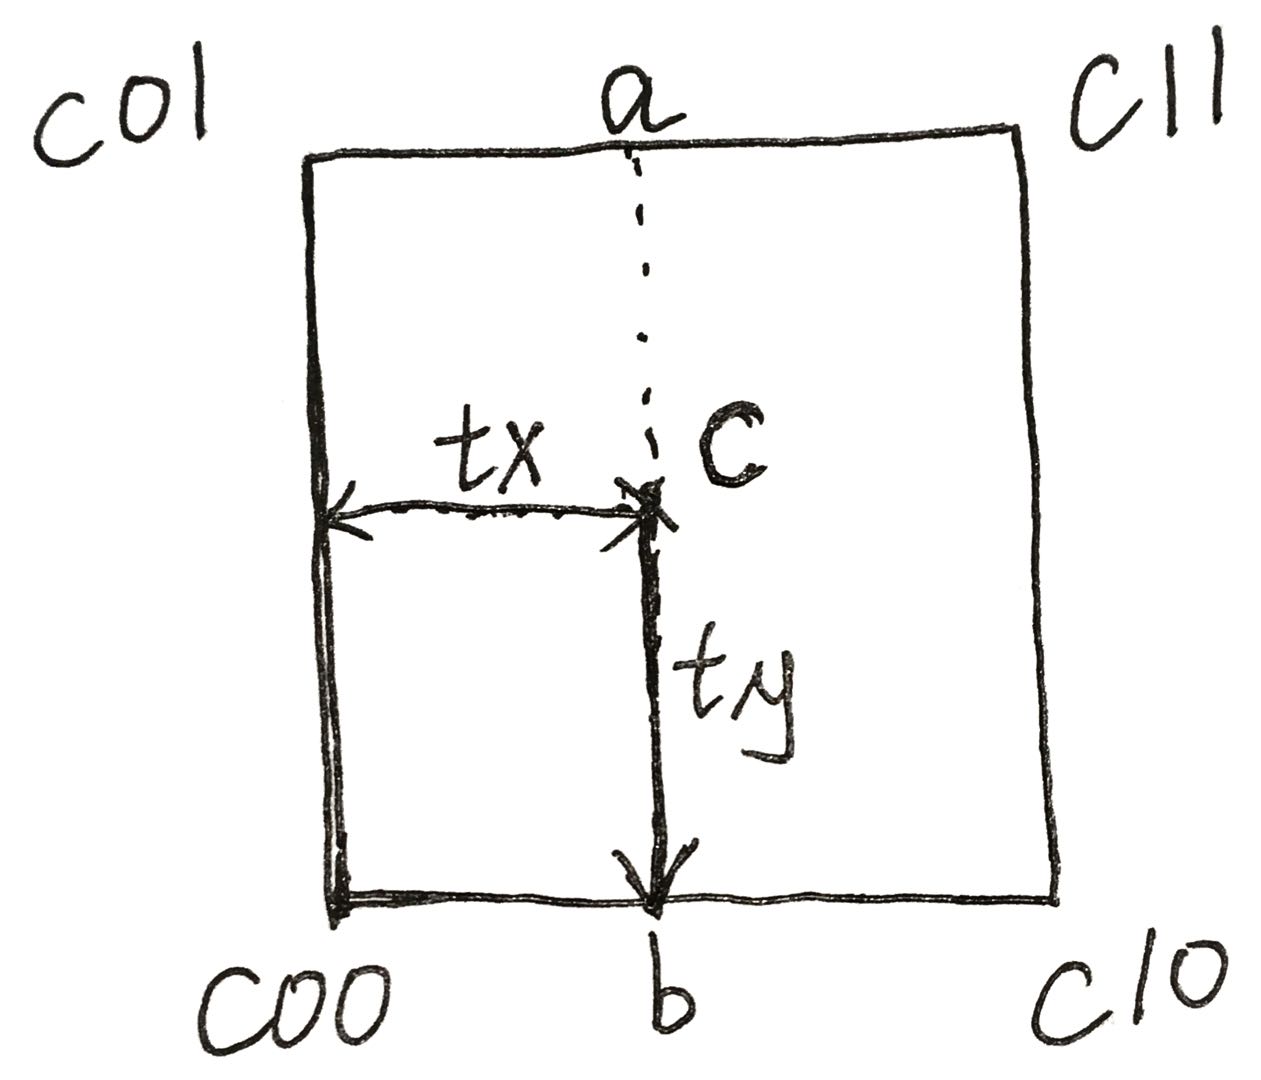
现在来看图像的处理方法。对于目标图像上的某个点来说,它的灰度值需要依靠原图像求得。于是可以将该像素的位置按照两张图像的比例缩放,得到该像素在原图上的取值坐标。但是得到的坐标值可能是浮点数,这时就可利用双线性插值法,取出该坐标周围的四个像素点,用这四个像素点的灰度值估算目标像素点的灰度值(见上面的公式)。对目标图像的每个像素点执行该操作就能得到相对应的灰度值,最终得到目标图像。
- 使用 Processing 实现该算法:
// bilinear interpolation
float bilinear(float tx, float ty, int c00, int c01, int c10, int c11) {
    return (1 - tx) * (1 - ty) * c00
            + (1 - tx) * ty * c01
            + tx * (1 - ty) * c10
            + tx * ty * c11;
}

// color -> gray value
int toGray(color c) {
    return int((red(c) + green(c) + blue(c)) / 3);
}

PImage scale(PImage source_img, int target_width, int target_height) {
    PImage target_img = createImage(target_width, target_height, RGB);
    source_img.loadPixels();
    target_img.loadPixels();

    for (int x = 0; x < target_width; x++) {
        for (int y = 0; y < target_height; y++) {
            float gx = (float(x) / target_width) * (source_img.width - 1);
            float gy = (float(y) / target_height) * (source_img.height - 1);
            int gxi = int(gx);
            int gyi = int(gy);
            int gxi_plus = min(gxi + 1, source_img.width - 1);
            int gyi_plus = min(gyi + 1, source_img.height - 1);
            int c00 = toGray(source_img.pixels[gxi + gyi * source_img.width]);
            int c01 = toGray(source_img.pixels[gxi + gyi_plus * source_img.width]);
            int c10 = toGray(source_img.pixels[gxi_plus + gyi * source_img.width]);
            int c11 = toGray(source_img.pixels[gxi_plus + gyi_plus * source_img.width]);
            // set pixel (x, y) in target image
            int gray = int(bilinear(gx - gxi, gy - gyi, c00, c01, c10, c11));
            target_img.pixels[x + target_img.width * y] = color(gray);
        }
    }

    target_img.updatePixels();
    return target_img;
}
图像量化
Write a function that takes a gray image and a target number of gray levels as input, and generates the quantized image as output. The function prototype is “quantize(input img, level) → “output img”, where “level” is an integer in [1, 256] defining the number of gray levels of output. You can modify the prototype if necessary.
为了让转换后的灰度值保持在 [0, 255] 的区间内,可以设置一个转换因子(conversion factor),其值为 255 / (numberOfLevels - 1)(其中 numberOfLevels 表示灰度等级数,此处暂不考虑等级数为 1 的情况),表示 255 相对于灰度等级数的大小。
在设置新的灰度等级后,首先需要知道每个灰度值属于哪一个灰度等级,计算方法为 gray-value / conversion-factor(需要取整),其值的范围是 [0, numberOfLevels - 1]。之后,再将该区间映射到 [0, 255],方法是在之前求得的值的基础上乘以转换因子。
总的来说,灰度变换的公式为:new-gray-value = Round(old-gray-value / conversion-factor) * conversion-factor。对原图像的每个像素点执行该变换即可得到目标图像。
另外,对于灰度等级为 1 的特殊情况,只需返回大小相同的全黑图像即可。
- 使用 Processing 实现该算法:
// color -> gray value
int toGray(color c) {
    return int((red(c) + green(c) + blue(c)) / 3);
}

PImage quantize(PImage source_img, int level) {
    PImage target_img = createImage(source_img.width, source_img.height, RGB);
    source_img.loadPixels();
    target_img.loadPixels();

    if (level == 1) {
        for (int x = 0; x < source_img.width; x++) {
            for (int y = 0; y < source_img.height; y++) {
                target_img.pixels[x + target_img.width * y] = color(0);
            }
        }
    }
    else {
        int conversion_factor = 255 / (level - 1);

        for (int x = 0; x < source_img.width; x++) {
            for (int y = 0; y < source_img.height; y++) {
                int old_gray = toGray(source_img.pixels[x + y * source_img.width]);
                int new_gray = round(float(old_gray) / conversion_factor) * conversion_factor;
                target_img.pixels[x + target_img.width * y] = color(new_gray);
            }
        }
    }

    target_img.updatePixels();
    return target_img;
}